
|4.585Mins Read
3 Beginner-Friendly Ways to Extract Audio from a Local Video
- Authors

- Name
- Geeks Kai
- @KaiGeeks
Extracting a video's audio can make your own interview, lecture or recording usable in a podcast or an audio editor. Start with a local file you own or have permission to use, and confirm that it contains a playable audio track. Extracting a file does not give you permission to republish someone else's recording.

| Method | Where it fits | Output and important limit |
|---|---|---|
| Audacity | Windows, macOS and Linux; useful when you also want to trim or edit audio | Export an audio file such as WAV or MP3. Importing many video formats requires compatible FFmpeg support. |
| WonderFox HD Video Converter Factory Pro | Windows; a local conversion workflow | Select an Audio output format. The Pro trial converts only the first five minutes of a file. |
| QuickTime Player | Mac; a built-in route for compatible movies | Audio Only exports MPEG-4 audio with an AAC track, rather than a choice of MP3/WAV encoders. |
These are local desktop workflows. A file extension alone does not establish compatibility: the container, audio codec, protection and condition of the file all matter.
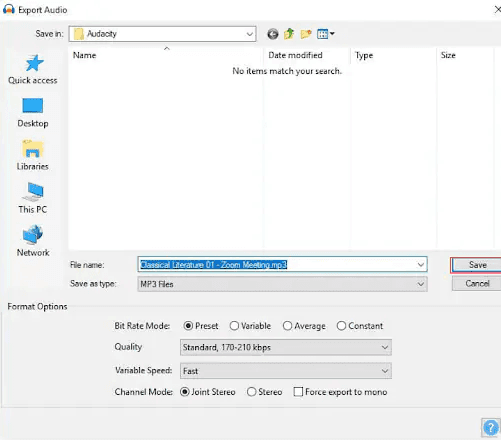
The existing illustration shows an earlier interface. Use the controls in your installed release; importing a container through FFmpeg is not a guarantee that every codec or protected file can be read.
Audacity supports audio editing, including trimming and effects. Its relevant limit here is media decoding and video-picture editing, not a lack of creative audio controls. If import fails, check the original file and supported FFmpeg combination before changing the extension or reinstalling unrelated software. See the official import guidance.
The vendor's video-to-audio guide describes this route:
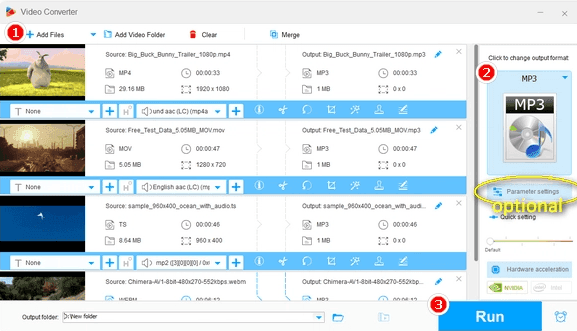
This is Windows software. The Pro trial limitation matters for longer files: a successful trial conversion may contain only the first five minutes. A download button labelled free does not establish unrestricted full-length conversion. Check the current product and system information before choosing it.
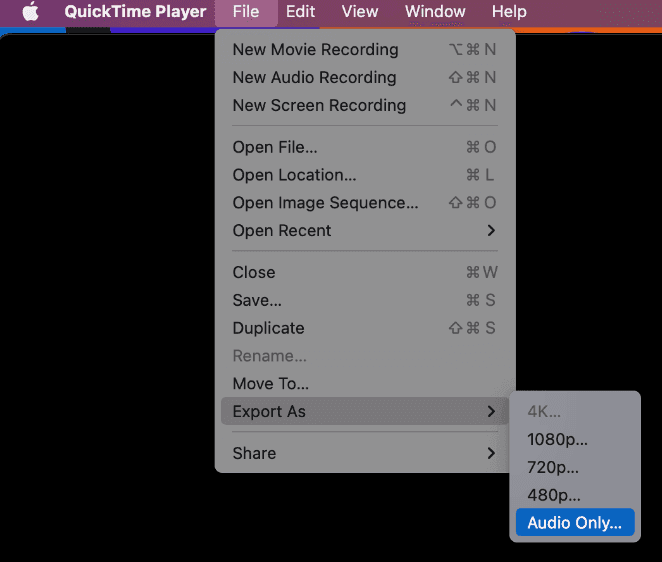
Apple specifies an Apple MPEG-4 audio file containing AAC for Audio Only. Renaming its extension to .mp3 does not convert it. If MP3 or WAV is required, convert the exported audio with an application that supports that format.
Listen to the output before using it. Confirm that it is audio-only, includes the intended soundtrack and has the intended duration. A WAV copy of already-compressed audio does not restore information that was lost earlier.
For an optional command-line inspection, install FFmpeg/FFprobe and run this on the actual output, replacing the filename if needed:
ffprobe -v error -show_entries stream=codec_type,codec_name,sample_rate,channels:format=duration -of json "extracted-audio.m4a"
The JSON should contain audio stream information and a plausible duration; an audio-only export should not contain a video stream. For QuickTime's documented Audio Only format, expect AAC inside the MPEG-4 audio file. A successful metadata check does not replace listening for a wrong track, silence, clipping or a bad edit.
The result is silent. First play the source and confirm it really has an audible track. Check whether the wrong language or silent stream was selected. A video with no audio stream has nothing to extract.
Import fails. Check decoding support, file damage and protection. Audacity's FFmpeg support expands compatible imports; it does not remove DRM or repair every damaged file.
The result is shorter than expected. Check trims, selected ranges and the WonderFox trial limit. Keep the original until the full output has been checked.
I need a different audio format or loudness. After extraction, the Audio Toolkit provides a separate audio-format and normalization workflow. For measured loudness processing, use the two-pass LUFS guide. Those are post-processing steps, not permission checks or guarantees that a missing soundtrack can be recovered.